
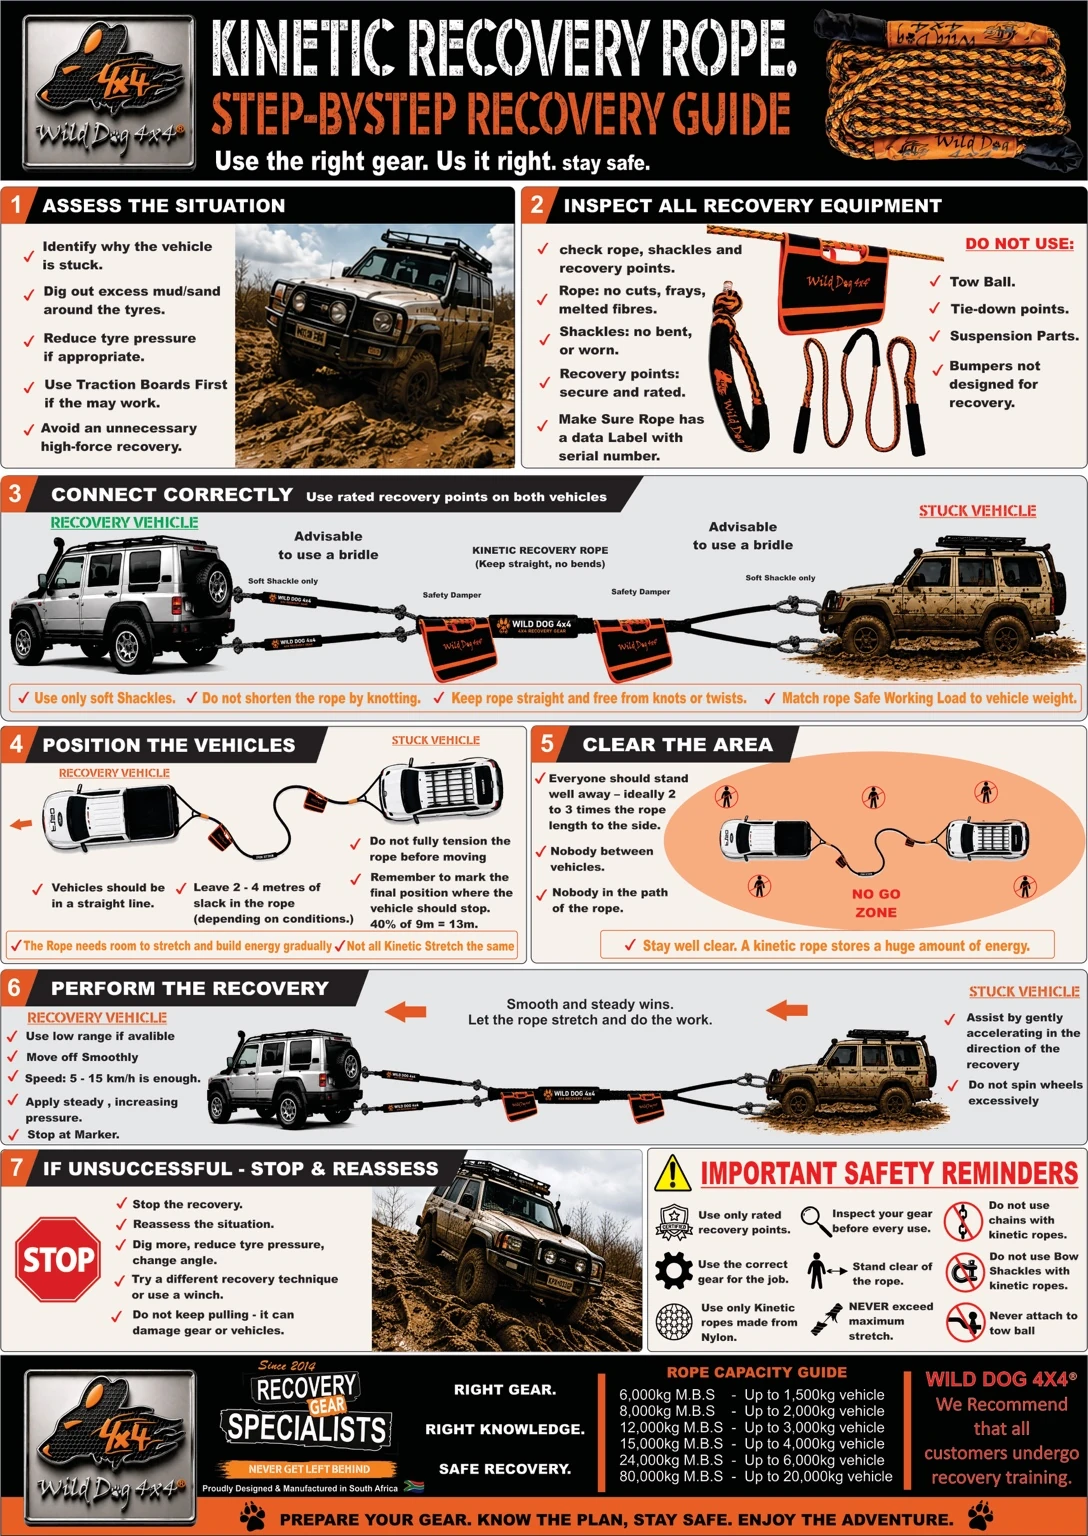
Step-by-Step Recovery Guide
Use the right gear. Use it right. Stay safe.
- ASSESS THE SITUATION
Before attempting any recovery:
✔ Identify why the vehicle is stuck.
✔ Dig out excess mud, sand, or debris around the tyres.
✔ Reduce tyre pressure if appropriate.
✔ Use traction boards first if they may solve the problem.
✔ Avoid an unnecessary high-force recovery.
- INSPECT ALL RECOVERY EQUIPMENT
Check all recovery gear before use.
✔ Inspect rope, shackles, and recovery points.
✔ Rope must have:
- No cuts
- No frays
- No melted fibres
✔ Shackles must not be:
- Bent
- Cracked
- Worn
✔ Recovery points must be:
- Rated
- Securely mounted
✔ Ensure the rope has a data label and serial number.
DO NOT USE:
✘ Tow balls
✘ Tie-down points
✘ Suspension parts
✘ Bumpers not designed for recovery
- CONNECT CORRECTLY
Use rated recovery points on both vehicles.
Recommended Setup:
- Use a bridle on both vehicles where possible.
- Use soft shackles only.
- Fit a safety damper to the recovery rope.
- Keep the kinetic rope straight with no bends or twists.
Important:
✔ Use only soft shackles.
✔ Never shorten a kinetic rope by tying knots.
✔ Keep the rope straight and free from twists.
✔ Match the rope’s Safe Working Load (SWL) to the vehicle weight.
- POSITION THE VEHICLES
Vehicle Positioning
✔ Vehicles should be aligned in a straight line.
✔ Leave 2–4 metres of slack in the rope (depending on conditions).
✔ Do not fully tension the rope before moving.
✔ Mark the final position of the stuck vehicle.
Example:
40% stretch of a 9m rope = approximately 13m total length.
Note:
The rope needs room to stretch and build energy gradually.
Not all kinetic ropes stretch the same.
- CLEAR THE AREA
Before beginning recovery:
✔ Everyone should stand well clear.
✔ Maintain a distance of approximately 2–3 times the rope length.
✔ Nobody should stand between the vehicles.
✔ Nobody should stand in the path of the rope.
NO GO ZONE
The area directly between and alongside the recovery path must remain clear at all times.
⚠ Stay well clear. A kinetic rope stores a large amount of energy.
- PERFORM THE RECOVERY
Recovery Vehicle
✔ Use low range if available.
✔ Move off smoothly.
✔ Recommended speed: 5–15 km/h.
✔ Apply steady, increasing pressure.
✔ Stop at the marker.
Stuck Vehicle
✔ Assist by gently accelerating in the direction of recovery.
✔ Avoid excessive wheel spin.
Remember:
Smooth and steady wins.
Allow the rope to stretch and perform the recovery.
- IF UNSUCCESSFUL – STOP & REASSESS
If the recovery does not work:
✔ Stop immediately.
✔ Reassess the situation.
✔ Dig more and reduce tyre pressure further.
✔ Change the recovery angle if required.
✔ Consider a different recovery method or use a winch.
✔ Do not continue pulling repeatedly.
Repeated recovery attempts can damage equipment and vehicles.
IMPORTANT SAFETY REMINDERS
✔ Use only rated recovery points.
✔ Inspect all recovery equipment before every use.
✔ Use the correct gear for the job.
✔ Stand clear of the recovery area.
✔ Use only kinetic ropes made from 100% Nylon.
✔ Never exceed the rope’s maximum stretch.
NEVER:
✘ Use chains with kinetic recovery ropes.
✘ Use bow shackles with kinetic ropes.
✘ Attach any recovery gear to a tow ball.
ROPE CAPACITY GUIDE
Minimum Breaking Strength (M.B.S.) | Recommended Vehicle Weight |
6,000 kg M.B.S. | Up to 1,500 kg vehicle |
8,000 kg M.B.S. | Up to 2,000 kg vehicle |
12,000 kg M.B.S. | Up to 3,000 kg vehicle |
16,000 kg M.B.S. | Up to 4,000 kg vehicle |
24,000 kg M.B.S. | Up to 6,000 kg vehicle |
80,000 kg M.B.S. | Up to 20,000 kg vehicle |
WILD DOG 4X4® RECOVERY GEAR SPECIALISTS
Right Gear.
Right Knowledge.
Safe Recovery.
Since 2014, Wild Dog 4X4® has been committed to providing quality recovery equipment and education to help off-road enthusiasts recover safely and responsibly.
Prepare your gear. Know the plan. Stay safe. Enjoy the adventure. 🐾